Introduction to DIY with LED lights
LED lights have become increasingly popular in recent years due to their energy efficiency and long lifespan. In addition to the cost savings and environmental benefits, LED lights offer a wide range of styles and options for various lighting needs. If you’re looking to upgrade your home or office lighting, you may be considering tackling a DIY project involving LED lights.
DIY projects can be a fun and satisfying way to save money and customize your space, but it’s important to have the right knowledge and tools to ensure a safe and successful project. With a little bit of research and some basic electrical skills, anyone can take on a DIY project involving LED lights.
In this tutorial, we’ll walk you through the steps of gathering the necessary tools and materials, determining the type of LED light you need, installing the LED lights, and troubleshooting common issues. We’ll also offer tips and cautionary advice along the way to help you achieve the best results.
So whether you’re looking to add some ambiance to your living room with LED strip lights, or you want to upgrade the lighting in your kitchen with LED panel lights, this tutorial has got you covered. By the end of this guide, you’ll be well-equipped to tackle a DIY LED light project with confidence.
Gather the necessary tools and materials
Before you start your DIY LED light project, it’s important to gather all the necessary tools and materials. Having everything you need on hand will help ensure a smooth and efficient process, and will also help you avoid any unnecessary delays or setbacks.
Here is a list of tools and materials you may need for a DIY LED light project:
- LED light bulbs or fixtures
- Screwdriver
- Wire stripper
- Wire connectors
- Voltage tester
- Electrical tape
- Ladder (if needed)
It’s important to use the correct tools and materials for your project to ensure safety and proper functionality. For example, using the wrong type of wire connector or electrical tape could result in a faulty connection or even a fire hazard. Make sure to follow the manufacturer’s instructions for the specific LED light you are using, and consult a professional if you are unsure about any aspect of the project.
In addition to the tools and materials listed above, you may also need additional items depending on your specific project. For example, if you are installing LED strip lights, you may need mounting tape or clips. If you are installing LED panel lights, you may need a drill and screws. Be sure to research and gather all the necessary materials before starting your project.
Finally, it’s a good idea to have a few extra LED light bulbs or fixtures on hand in case of any issues or accidents. It’s better to be prepared than to have to interrupt your project to run to the store for more supplies. With the right tools and materials at your disposal, you’ll be well-equipped to tackle your DIY LED light project with confidence.
Determine the type of LED light you need
When it comes to LED lights, there are many different options to choose from. LED bulbs, strip lights, and panel lights are just a few of the choices available, and each type has its own unique features and benefits. It’s important to consider your specific needs and preferences when selecting the appropriate LED light for your project.
Here are a few factors to consider when choosing an LED light:
- Size and style: Consider the size and style of the light you need, as well as the size and style of the space it will be installed in. For example, if you have a small bathroom, you may want to consider using small, discreet LED bulbs or strip lights. If you have a large open space, you may want to consider using larger LED panel lights or a combination of different types of lights.
- Purpose of the light: Think about the purpose of the light and how you want to use it. Do you need task lighting, accent lighting, or ambient lighting? Different types of LED lights are better suited for different purposes. For example, LED strip lights are great for accent lighting and creating ambiance, while LED panel lights are better for task lighting and illuminating larger areas.
- Location of the light: Consider the location of the light and any potential challenges or limitations. For example, if you are installing LED lights in a damp location, such as a bathroom or outdoor area, you’ll need to choose a light that is suitable for damp environments. You’ll also want to consider the wiring and electrical setup of the location, as well as any local building codes that may apply.
By considering these factors, you can narrow down your options and select the best LED light for your project. Don’t be afraid to ask for help or advice from a professional if you are unsure about which type of LED light is best for your needs. With the right LED light, you’ll be well on your way to creating a beautiful and functional lighting solution for your space.
Install the LED lights
Once you have gathered all the necessary tools and materials, and have chosen the appropriate LED light for your project, it’s time to start the installation process. Installing LED lights is generally a straightforward process, but it’s important to follow the steps carefully and use caution when handling electrical components.
Here are the basic steps for installing LED lights:
- Turn off the power: Before you start any electrical work, it’s essential to turn off the power to the area you will be working in. This can typically be done by flipping the circuit breaker or removing the fuse for the circuit. Use a voltage tester to confirm that there is no electricity flowing to the wires before proceeding.
- Remove the old light fixture or bulb: Depending on your project, you may need to remove an existing light fixture or light bulb. Use a screwdriver to remove any screws or clips, and be careful not to damage the wires.
- Connect the wires: Once the old light fixture or bulb is removed, you’ll need to connect the wires of the LED light to the wires in the electrical box. Follow the manufacturer’s instructions for the specific LED light you are using, and be sure to use wire connectors to secure the connection.
- Install the LED light: Place the LED light in the appropriate location, and secure it in place using screws or mounting clips if necessary. Follow the manufacturer’s instructions for the specific LED light you are using.
- Test the LED light: Once the LED light is installed, turn the power back on and test the light to make sure it’s working properly. If the light is not turning on or is flickering, you may need to troubleshoot the issue (see next section).
By following these steps, you can successfully install LED lights in your home or office. Remember to use caution when handling electrical components, and seek professional help if you are unsure about any aspect of the project. With the right knowledge and tools, you can confidently tackle a DIY LED light installation project.
Troubleshoot common issues
Despite your best efforts, you may encounter issues when installing LED lights. Whether the LED light is not turning on or is flickering, there are a few common issues that may arise and some steps you can take to troubleshoot them.
Here are a few common issues and potential solutions:
- LED light not turning on: If the LED light is not turning on after installation, there may be a problem with the wiring or the light itself. First, check to make sure the power is turned on and the circuit breaker has not been tripped. Next, check the connections to make sure the wires are properly connected and secure. If the issue persists, you may need to replace the LED light or seek professional help.
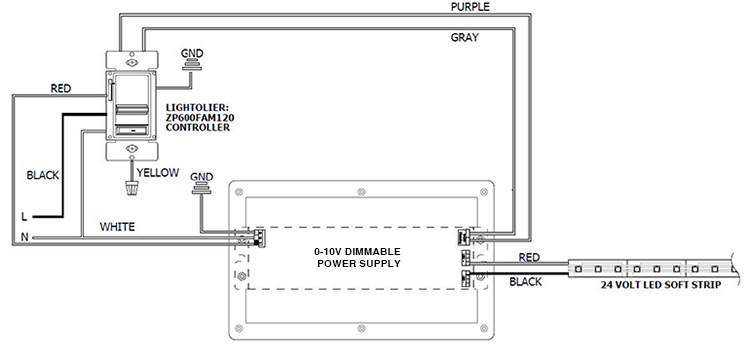
- LED light flickering: If the LED light is flickering, it may be caused by a problem with the dimmer switch or the type of LED light being used. LED lights are sensitive to certain types of dimmer switches, and using the wrong type of dimmer switch can cause flickering. Try replacing the dimmer switch with a compatible one, or consult the manufacturer’s instructions for the specific LED light you are using to see if it is compatible with dimmer switches. If the issue persists, you may need to seek professional help.
- Other issues: If you are experiencing other issues with your LED lights, such as a buzzing noise or uneven lighting, you may need to troubleshoot the issue or seek professional help. Make sure to follow the manufacturer’s instructions and consult a professional if you are unsure about how to resolve the issue.
By troubleshooting common issues, you can often solve problems with your LED lights and get them working properly. Remember to use caution when handling electrical components, and seek professional help if you are unsure about any aspect of the project. With the right knowledge and tools, you can troubleshoot and resolve issues with your LED lights.
Conclusion: Best DIY using LED lights
In conclusion, DIY projects involving LED lights can be a fun and satisfying way to save money and customize your space. With the right knowledge and tools, anyone can tackle a DIY LED light project and enjoy the benefits of energy-efficient and long-lasting LED lights. By following the steps outlined in this tutorial, you can gather the necessary tools and materials, determine the type of LED light you need, install the LED lights, and troubleshoot common issues.
We hope this tutorial has helped you feel confident and equipped to tackle your own DIY LED light project. Remember to follow proper safety precautions and seek professional help if needed. With the right approach, you can create a beautiful and functional lighting solution for your home or office.
FAQs about DIY with LED lights
LED lights offer many benefits, including energy efficiency, long lifespan, and a wide range of styles and options. LED lights use less energy than traditional incandescent bulbs, which can save you money on your energy bills. They also have a longer lifespan, lasting up to 50,000 hours, compared to only 1,000 hours for incandescent bulbs. LED lights are also available in a variety of styles, colors, and sizes, making them suitable for a wide range of lighting needs.
With the right knowledge and tools, anyone can tackle a DIY LED light project. However, it’s important to follow proper safety precautions and seek professional help if needed. If you are unfamiliar with electrical work or have any doubts about your abilities, it’s best to consult a professional electrician.
The tools and materials you’ll need for a DIY LED light project will depend on the specific project you are undertaking. However, some common tools and materials you may need include LED light bulbs or fixtures, a screwdriver, wire stripper, wire connectors, a voltage tester, electrical tape, and a ladder (if needed).
When choosing an LED light for your project, consider the size and style of the light, the purpose of the light, and the location of the light. Make sure to consider the size and style of the space the light will be installed in, as well as the specific lighting needs of the space.