Introduction to wiring 0-10V dimming system
0-10V dimming is a popular method for controlling the brightness of LED lighting systems. It involves using a dimming controller to adjust the voltage of the power supply to the LED drivers, which in turn adjusts the brightness of the connected LED lights. This type of dimming is especially useful in commercial and industrial settings where precise control over lighting levels is important.
Installing a 0-10V dimming system can offer numerous benefits, such as energy savings, improved aesthetics, and increased functionality. For example, dimming LED lights can help reduce energy consumption by decreasing the amount of power needed to run the lights, which can translate to cost savings on electricity bills. Dimming LED lights can also enhance the ambiance of a space by allowing users to adjust the lighting to suit their preferences and needs. Additionally, 0-10V dimming can allow users to fine-tune the lighting levels for specific tasks or activities, such as reading or working.
In this guide, we will walk you through the process of how to wire a 0-10V dimming system for LED lighting. We will cover everything you need to know, including the tools and materials required, the steps for preparing and installing the dimming controller and LED drivers, and how to test and troubleshoot the system. By the end of this guide, you should have a clear understanding of how to wire a 0-10V dimming system and be well on your way to enjoying the many benefits it has to offer.
Preparing the Wiring
Before you begin the actual wiring process for your 0-10V dimming system, it’s important to take some time to properly plan and prepare the wiring layout. This will ensure that the wiring is organized and efficient, making the installation process easier and more streamlined.
Here are some tips for preparing the wiring for your 0-10V dimming system:
- Determine the location of the dimming controller: The dimming controller should be mounted in a convenient and accessible location, such as a utility room or electrical closet. This will make it easy to adjust the lighting levels as needed and to troubleshoot any issues that may arise.
- Plan the wiring route: Take the time to carefully plan the route that the wiring will take from the dimming controller to the LED drivers and LED lights. This will help you determine the length of wire you need and ensure that the wiring is routed efficiently and neatly.
- Gather all necessary wire and supplies: Make sure you have all the necessary wire and supplies on hand before beginning the wiring process. This will save you time and frustration during the installation.
- Turn off the power: Before you begin any wiring work, it’s essential to turn off the power to the circuit you will be working on. This is a crucial safety measure that will prevent accidents and injuries. Use a voltage tester to verify that the circuit is off before proceeding.
- Follow local building codes: Be sure to familiarize yourself with the local building codes and regulations for wiring and electrical installations. These codes are in place to ensure the safety and functionality of electrical systems, so it’s important to follow them to the letter.
Taking the time to properly prepare the wiring for your 0-10V dimming system will pay off in the long run by making the installation process easier and more efficient. By following these tips, you can ensure that your 0-10V dimming system is installed safely and correctly.
Installing the 0-10V Dimming Controller
Once you have prepared the wiring and gathered all the necessary tools and materials, it’s time to install the 0-10V dimming controller. This is a crucial step in the process, as the dimming controller is responsible for adjusting the voltage to the LED drivers and ultimately controlling the brightness of the LED lights.
Here are the steps for installing the 0-10V dimming controller:
- Mount the dimming controller: The dimming controller should be mounted in a convenient and accessible location, such as a utility room or electrical closet. Follow the manufacturer’s instructions for mounting the controller, which may involve screws, brackets, or other hardware.
- Connect the power supply: The dimming controller will need a power supply to operate. Consult the manufacturer’s instructions for the recommended power supply and follow the steps for connecting it to the dimming controller.
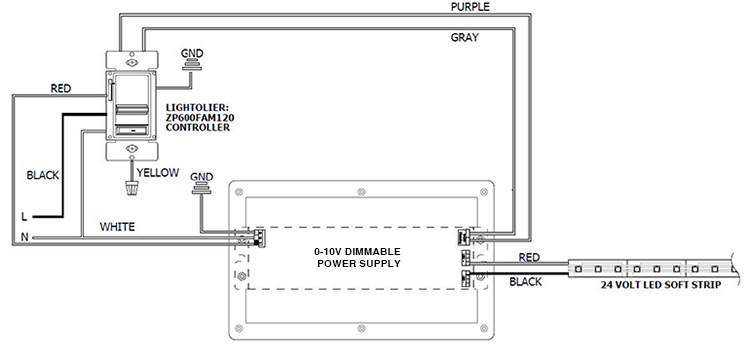
- Wire the dimming controller to the LED drivers: Once the dimming controller is mounted and powered, it’s time to wire it to the LED drivers. Follow the manufacturer’s instructions for wiring the dimming controller to the LED drivers, taking care to use the appropriate wire size and connectors.
- Test the dimming controller: Once the wiring is complete, it’s important to test the dimming controller to ensure it is working properly. Follow the manufacturer’s instructions for testing the controller, which may involve using a multimeter or other testing device.
Installing the 0-10V dimming controller is a crucial step in the process of wiring a 0-10V dimming system for LED lighting. By following these steps and consulting the manufacturer’s instructions, you can ensure that the controller is installed correctly and is ready to begin controlling the brightness of your LED lights.
Wiring the LED Drivers
Once the 0-10V dimming controller is installed, it’s time to wire the LED drivers to the controller. The LED drivers are responsible for converting the incoming voltage to the correct level for the LED lights to operate properly, so it’s important to wire them correctly to ensure proper operation of the lighting system.
Here are the steps for wiring the LED drivers to the 0-10V dimming controller:
- Determine the wire size and length: The wire size and length will depend on the distance between the dimming controller and the LED drivers, as well as the wattage of the LED lights. Consult the manufacturer’s instructions for the appropriate wire size and length.
- Strip the wire insulation: Use a wire stripper to strip the insulation off the ends of the wire to expose the bare wire. Be sure to strip enough insulation to make a secure connection, but not so much that the wire is damaged.
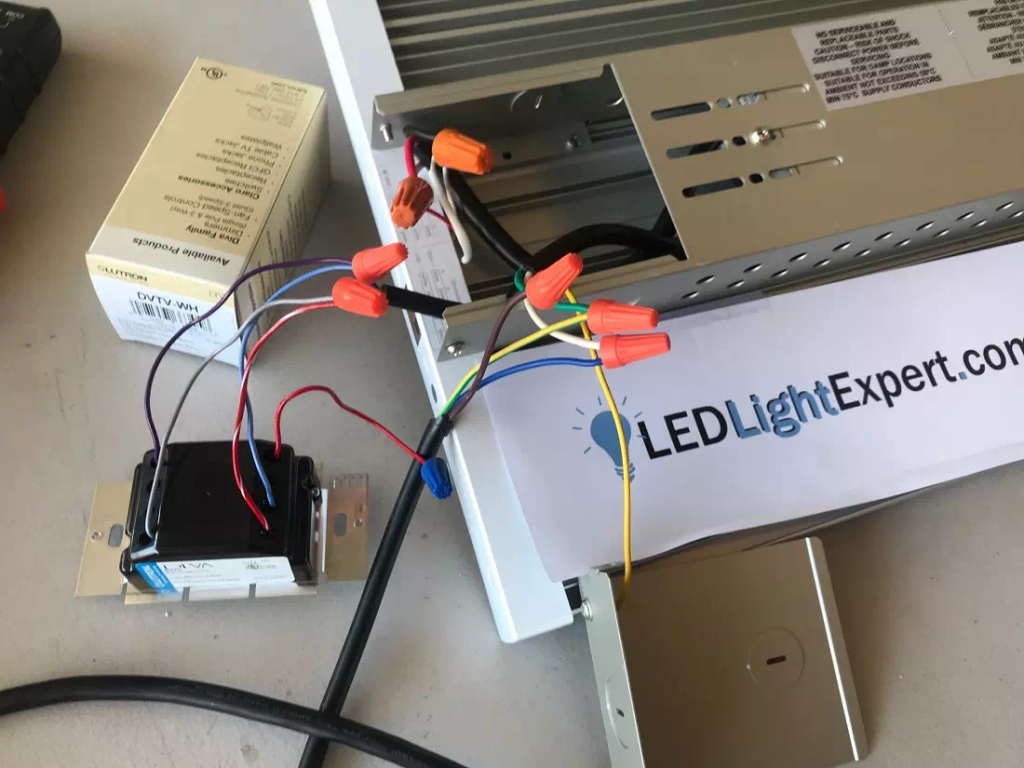
- Connect the wires: Follow the manufacturer’s instructions for connecting the wires to the dimming controller and LED drivers. This may involve using wire connectors or soldering the connections. Be sure to use the appropriate connectors and techniques to ensure a secure and safe connection.
- Secure the connections: Once the wires are connected, use electrical tape or wire nuts to secure the connections and prevent them from coming loose.
- Test the LED drivers: After the LED drivers are wired to the dimming controller, it’s important to test them to ensure they are working properly. Follow the manufacturer’s instructions for testing the LED drivers, which may involve using a multimeter or other testing device.
Wiring the LED drivers to the 0-10V dimming controller is an important step in the process of installing a 0-10V dimming system for LED lighting. By following these steps and consulting the manufacturer’s instructions, you can ensure that the LED drivers are wired correctly and are ready to provide power to the LED lights.
Testing and Troubleshooting
After the 0-10V dimming controller and LED drivers are installed and wired, it’s important to test the system to ensure it is working properly. This will allow you to identify and address any issues that may arise, ensuring that your 0-10V dimming system is functioning optimally.
Here are some steps for testing and troubleshooting your 0-10V dimming system:
- Test the dimming controller: Begin by testing the dimming controller to ensure it is functioning properly. Follow the manufacturer’s instructions for testing the controller, which may involve using a multimeter or other testing device.
- Test the LED drivers: Next, test the LED drivers to ensure they are providing the correct voltage and current to the LED lights. Follow the manufacturer’s instructions for testing the LED drivers, which may involve using a multimeter or other testing device.
- Test the LED lights: After the dimming controller and LED drivers have been tested, it’s time to test the LED lights to ensure they are functioning properly. Begin by turning on the power to the circuit and adjusting the dimming controller to different levels to see if the LED lights respond accordingly.
- Troubleshoot any issues: If you encounter any issues during the testing process, it’s important to troubleshoot them as soon as possible to prevent any further problems. Some common issues that may arise include:
- The LED lights are not dimming properly: This could be due to a variety of issues, such as a malfunctioning dimming controller, incorrect wiring, or incompatible LED drivers. Check the manufacturer’s instructions and consult with a qualified electrician or lighting professional to troubleshoot the issue.
- The LED lights are flickering: This could be due to a variety of issues, such as incorrect wiring, faulty LED drivers, or incompatible dimming controllers. Check the manufacturer’s instructions and consult with a qualified electrician or lighting professional to troubleshoot the issue.
Testing and troubleshooting your 0-10V dimming system is an important step in the process of ensuring that it is functioning properly. By following these steps and consulting the manufacturer’s instructions, you can identify and address any issues that may arise, ensuring that your 0-10V dimming system is operating optimally.
Conclusion: A Comprehensive Guide to Wiring a 0-10V Dimming System for LED Lighting
Installing a 0-10V dimming system for LED lighting can offer numerous benefits, including energy savings, improved aesthetics, and increased functionality. By following the steps outlined in this guide, you can wire a 0-10V dimming system for your LED lighting and enjoy all the benefits it has to offer.
To summarize, the process of wiring a 0-10V dimming system for LED lighting involves the following steps:
- Gather the necessary tools and materials, including a 0-10V dimming controller, LED drivers, wire stripper, wire nuts, electrical tape, screwdriver, wire connectors, and voltage tester.
- Prepare the wiring by determining the location of the dimming controller, planning the wiring route, gathering all necessary wire and supplies, and turning off the power to the circuit.
- Install the 0-10V dimming controller by mounting it, connecting the power supply, and wiring it to the LED drivers.
- Wire the LED drivers to the dimming controller by determining the wire size and length, stripping the wire insulation, connecting the wires, securing the connections, and testing the LED drivers.
- Test and troubleshoot the system by testing the dimming controller, LED drivers, and LED lights, and troubleshooting any issues that may arise.
By following these steps and consulting the manufacturer’s instructions, you can ensure that your 0-10V dimming system is installed safely and correctly, and is ready to provide precise control over the brightness of your LED lighting.
FAQs about wiring 0-10V dimming system
0-10V dimming is a method for controlling the brightness of LED lighting systems by adjusting the voltage of the power supply to the LED drivers. It involves using a dimming controller to adjust the voltage, which in turn adjusts the brightness of the connected LED lights. 0-10V dimming is especially useful in commercial and industrial settings where precise control over lighting levels is important.
There are numerous benefits to using 0-10V dimming for LED lighting, including energy savings, improved aesthetics, and increased functionality. Dimming LED lights can help reduce energy consumption by decreasing the amount of power needed to run the lights, which can translate to cost savings on electricity bills. Dimming LED lights can also enhance the ambiance of a space by allowing users to adjust the lighting to suit their preferences and needs. Additionally, 0-10V dimming can allow users to fine-tune the lighting levels for specific tasks or activities, such as reading or working.
To wire a 0-10V dimming system, you will need a variety of tools and materials, including a 0-10V dimming controller, LED drivers, wire stripper, wire nuts, electrical tape, screwdriver, wire connectors, and voltage tester. You will also need a supply of electrical wire in the appropriate gauge for your installation. It’s important to use the correct tools and materials to ensure that the system is installed properly and safely.
-Gather the necessary tools and materials
-Prepare the wiring by determining the location of the dimming controller, planning the wiring route, gathering all necessary wire and supplies, and turning off the power to the circuit
-Install the 0-10V dimming controller by mounting it, connecting the power supply, and wiring it to the LED drivers
-Wire the LED drivers to the dimming controller by determining the wire size and length, stripping the wire insulation, connecting the wires, securing the connections, and testing the LED drivers
-Test and troubleshoot the system by testing the dimming controller, LED drivers, and LED lights, and troubleshooting any issues that may arise.
-The LED lights are not dimming properly: This could be due to a malfunctioning dimming controller, incorrect wiring, or incompatible LED drivers. Check the manufacturer’s instructions and consult with a qualified electrician or lighting professional to troubleshoot the issue.
-The LED lights are flickering: This could be due to incorrect wiring,