Introduction to wiring shop lights
Wiring shop lights to a switch is a simple electrical project that can improve the functionality and convenience of any workshop or garage. By installing a switch, you can easily turn the lights on and off without having to fumble for the light fixture itself. However, it’s important to take the necessary safety precautions and follow proper electrical installation procedures to ensure a successful project and avoid any potential hazards.
Before you get started, you’ll need to gather the necessary tools and materials. This will likely include a switch, wire stripper, wire connectors, and a drill with screwdriver bits. You’ll also need a circuit breaker or fuse box to access the power source for the shop lights.
Once you have everything you need, the first step is to determine the power source for the shop lights. This will typically be a circuit breaker or fuse box, which you can locate by looking for the main panel in your home or workshop. Once you’ve found the power source, the next step is to turn off the power to the circuit. This is an important safety measure to prevent any electrical accidents while you’re working on the project.
Once the power is off, you can begin installing the switch. This will involve installing a switch box in the desired location, running wire from the power source to the switch box, and connecting the wires to the switch. You’ll then need to mount the switch in the box and finish up any necessary wiring.
With the switch installed, you can then move on to installing the shop lights. This will involve mounting the lights in the desired location, running wire from the switch box to the lights, and connecting the wires to the lights. Once everything is wired and installed, it’s important to test the circuit to ensure that the lights and switch are functioning properly.
Overall, wiring shop lights to a switch is a relatively straightforward project that can greatly improve the functionality and convenience of your workshop or garage. By following these steps and taking the necessary safety precautions, you can successfully install a switch and have complete control over your shop lights.
Determine the Power Source
Before you can begin wiring your shop lights to a switch, it’s important to determine the power source for the lights. This will typically be a circuit breaker or fuse box, which you can locate by looking for the main panel in your home or workshop.
To determine the power source for your shop lights, start by identifying the circuit that supplies power to the area where the lights will be installed. You can do this by looking for outlets or light fixtures that are already installed in the area. If you have a circuit breaker panel, you can also locate the circuit by looking for the labeled breaker that corresponds to the area where the lights will be installed.
If you have a fuse box, you’ll need to locate the fuse that corresponds to the area where the lights will be installed. This can typically be done by looking for a labeled diagram or chart on the inside of the fuse box cover.
Once you’ve identified the power source for your shop lights, you’ll be ready to move on to the next step of the installation process: turning off the power. This is an important safety measure to prevent any electrical accidents while you’re working on the project.
To turn off the power, simply locate the circuit breaker or fuse that supplies power to the area where the lights will be installed. If you have a circuit breaker panel, you can turn off the power by flipping the breaker to the “off” position. If you have a fuse box, you’ll need to remove the fuse that corresponds to the area where the lights will be installed.
Once the power is off, you can proceed with the installation of the switch and shop lights. It’s important to remember to keep the power off until you’ve completed the installation and tested the circuit to ensure that everything is working properly. By following these steps and taking the necessary safety precautions, you can successfully install your shop lights and switch without any mishaps.
Install the Switch
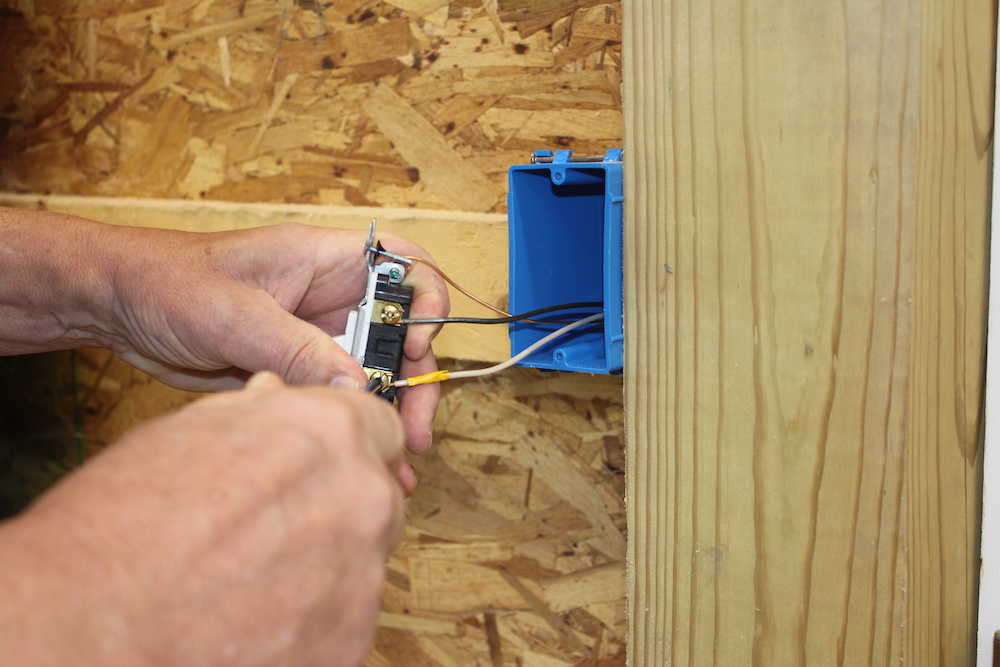
With the power turned off, you can begin installing the switch for your shop lights. The first step is to install a switch box in the desired location for the switch. This will typically involve drilling holes and using screws to secure the box to the wall or ceiling.
Once the switch box is installed, you’ll need to run wire from the power source to the switch box. To do this, you’ll need to use wire strippers to remove a small portion of the insulation from the ends of the wire. You’ll then need to connect the wires to the switch using wire connectors.
There are a few different types of wire connectors you can use, including twist-on wire connectors, wire nuts, and wire caps. It’s important to choose the appropriate connector for the wire gauge and type you are working with.
Once the wires are connected to the switch, you can mount the switch in the box. This will typically involve attaching the switch to the box using screws.
With the switch installed and wired, you can then move on to installing the shop lights. It’s important to remember to keep the power off until you’ve completed the installation and tested the circuit to ensure that everything is working properly. By following these steps and taking the necessary safety precautions, you can successfully install your shop lights and switch without any mishaps.
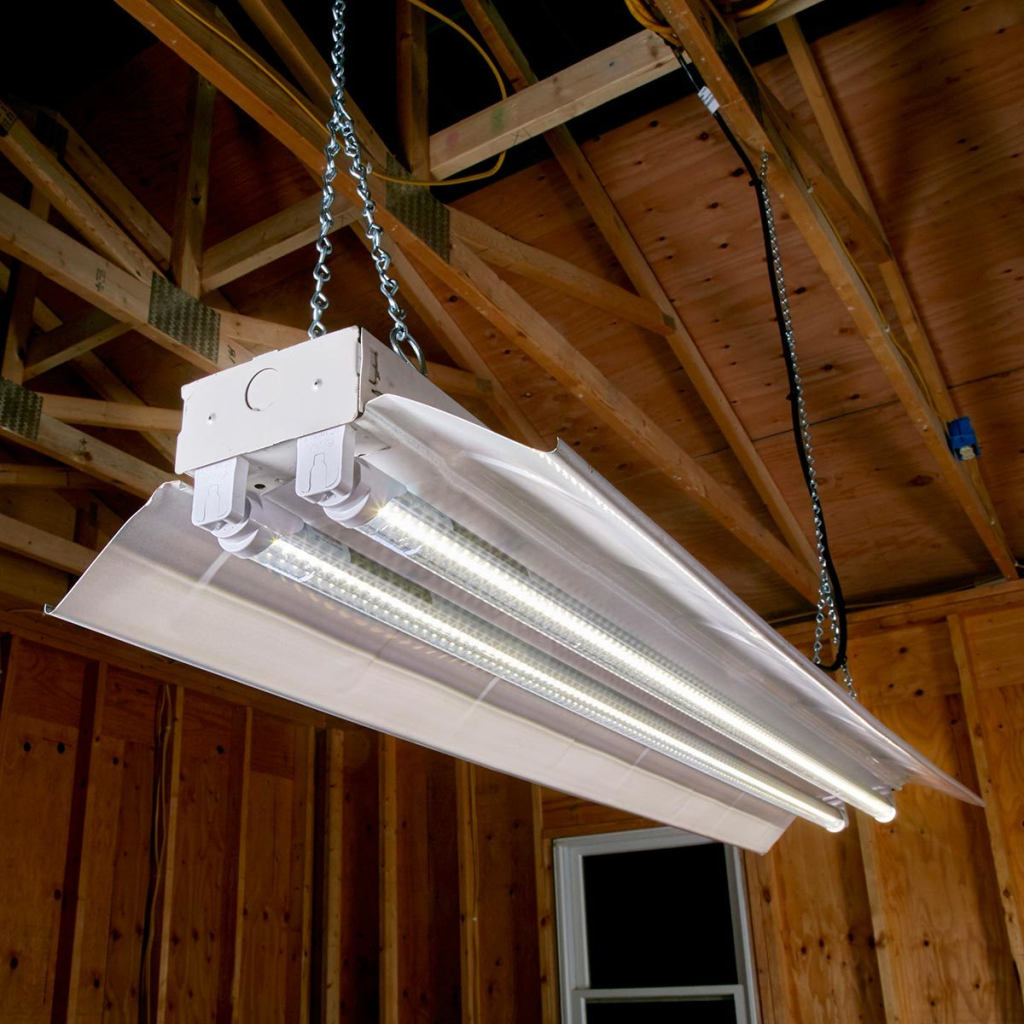
Install the Shop Lights
With the switch installed and wired, the next step is to install the shop lights. This will typically involve mounting the lights in the desired location, running wire from the switch box to the lights, and connecting the wires to the lights.
To mount the shop lights, you’ll need to drill holes and use screws to secure the lights to the wall or ceiling. Make sure to follow the manufacturer’s instructions for proper installation.
Once the lights are mounted, you’ll need to run wire from the switch box to the lights. To do this, you’ll need to use wire strippers to remove a small portion of the insulation from the ends of the wire. You’ll then need to connect the wires to the lights using wire connectors.
There are a few different types of wire connectors you can use, including twist-on wire connectors, wire nuts, and wire caps. It’s important to choose the appropriate connector for the wire gauge and type you are working with.
Once the wires are connected to the shop lights, you can finish up any necessary wiring and install any additional fixtures or components. It’s important to remember to keep the power off until you’ve completed the installation and tested the circuit to ensure that everything is working properly.
By following these steps and taking the necessary safety precautions, you can successfully install your shop lights and switch without any mishaps. With the lights wired to a switch, you’ll have convenient control over the lighting in your workshop or garage, improving the functionality and efficiency of your space.
Test the Circuit
Once the shop lights and switch are installed and wired, it’s important to test the circuit to ensure that everything is functioning properly. To do this, you’ll need to turn the power back on and test the lights and switch.
To turn the power back on, simply locate the circuit breaker or fuse that supplies power to the area where the lights are installed. If you have a circuit breaker panel, you can turn the power back on by flipping the breaker to the “on” position. If you have a fuse box, you’ll need to reinsert the fuse that corresponds to the area where the lights are installed.
Once the power is back on, you can test the circuit by turning the switch on and off to make sure that the shop lights are functioning properly. If the lights are working correctly, you’re all set! You can now enjoy the convenience of being able to control the lighting in your workshop or garage with the flip of a switch.
If the lights aren’t working properly, you’ll need to troubleshoot the issue. This may involve checking the wiring and connections to make sure everything is secure and properly connected. If you’re unable to resolve the issue on your own, it’s a good idea to seek the assistance of a professional electrician.
By following these steps and taking the necessary safety precautions, you can successfully install your shop lights and switch and enjoy the convenience and functionality of being able to control the lighting in your workshop or garage.
Conclusion: A Recap of the Steps for Wiring Shop Lights to a Switch
In conclusion, wiring shop lights to a switch is a simple electrical project that can improve the functionality and convenience of any workshop or garage. By following the steps outlined in this guide and taking the necessary safety precautions, you can successfully install your shop lights and switch and have complete control over the lighting in your space.
The process involves determining the power source for the lights, turning off the power to the circuit, installing the switch and running wire from the power source to the switch, installing the shop lights and running wire from the switch to the lights, and testing the circuit to ensure that everything is working properly.
It’s important to remember to always take the necessary safety precautions when working with electricity. If you’re not comfortable with electrical work, it’s a good idea to seek the assistance of a professional electrician.
Overall, wiring shop lights to a switch is a relatively straightforward project that can greatly improve the functionality and convenience of your workshop or garage. With the lights wired to a switch, you’ll have convenient control over the lighting in your space, improving the efficiency and effectiveness of your work environment.
Frequently Asked Questions about wiring shop lights
You’ll need a switch, wire stripper, wire connectors, and a drill with screwdriver bits. You may also need additional materials such as wire, mounting hardware, and a circuit breaker or fuse box to access the power source for the shop lights.
To determine the power source for the shop lights, start by identifying the circuit that supplies power to the area where the lights will be installed. You can do this by looking for outlets or light fixtures that are already installed in the area. If you have a circuit breaker panel, you can locate the circuit by looking for the labeled breaker that corresponds to the area where the lights will be installed. If you have a fuse box, you’ll need to locate the fuse that corresponds to the area where the lights will be installed.
To turn off the power to the circuit, simply locate the circuit breaker or fuse that supplies power to the area where the lights will be installed. If you have a circuit breaker panel, you can turn off the power by flipping the breaker to the “off” position. If you have a fuse box, you’ll need to remove the fuse that corresponds to the area where the lights will be installed.
To install the switch, you’ll need to install a switch box in the desired location, run wire from the power source to the switch box, and connect the wires to the switch. You’ll then need to mount the switch in the box and finish up any necessary wiring.
To install the shop lights, you’ll need to mount the lights in the desired location, run wire from the switch box to the lights, and connect the wires to the lights. You’ll also need to finish up any necessary wiring and install any additional fixtures or components.
To test the circuit, you’ll need to turn the power back on and test the lights and switch by turning the switch on and off to make sure that the shop lights are functioning properly. If the lights aren’t working properly, you’ll need to troubleshoot the issue and possibly seek the assistance of a professional electrician.