- How to Access the Snipping Tool on Lenovo Computers
- Features of the Snipping Tool on Lenovo Computers
- Advanced Uses of the Snipping Tool on Lenovo Computers
- Conclusion: The Snipping Tool is a Valuable Tool for Improving Productivity on Lenovo Computers
- Frequently Asked Questions
- What is the Snipping Tool?
- How do I access the Snipping Tool on my Lenovo computer?
- What are the different capture modes available in the Snipping Tool on Lenovo computers?
- Can I annotate and highlight my snips with the Snipping Tool on Lenovo computers?
- Can I save and share my snips with the Snipping Tool on Lenovo computers?
- Can I set the Snipping Tool to automatically save my snips to a specific location on my Lenovo computer?
- What should I do if I encounter issues with the Snipping Tool on my Lenovo computer?
Introduction to Lenovo’s snipping tool
The Snipping Tool is a handy feature that comes pre-installed on many modern computer operating systems, including those used on Lenovo computers. It allows users to easily capture screenshots of their screen, either in full or in part, and provides tools for annotating and highlighting the screenshot.
The Snipping Tool is a valuable tool for productivity, as it allows users to quickly and easily capture information from their screen and share it with others. For example, a user could use the Snipping Tool to capture an important email, document, or website and save it for later reference or share it with a colleague. The annotation and highlighting tools allow users to add notes and draw attention to specific parts of the screenshot, making it easier to communicate and collaborate with others.
In addition to its basic screenshot capturing capabilities, the Snipping Tool also offers advanced features that can help users streamline their workflow and save time. For example, users can set the Snipping Tool to automatically save snips to a specific location, or use it in combination with other productivity tools like OneNote to further organize and categorize their screenshots.
Overall, the Snipping Tool is a versatile and powerful tool that can greatly improve productivity for users of Lenovo computers. In this blog post, we will explore the various features and uses of the Snipping Tool on Lenovo computers, and provide tips and tricks for getting the most out of this useful tool.
How to Access the Snipping Tool on Lenovo Computers
There are several ways to access and launch the Snipping Tool on Lenovo computers. Here are two methods:
Method 1: Navigating to the Snipping Tool through the Start menu
- Click on the Start button in the bottom left corner of the screen.
- In the search bar, type “Snipping Tool” and press Enter.
- The Snipping Tool should appear in the search results. Click on it to launch the tool.
Method 2: Using keyboard shortcuts to open the Snipping Tool
- Press the Windows key and the S key at the same time. This will open the search bar.
- In the search bar, type “Snipping Tool” and press Enter.
- The Snipping Tool should appear in the search results. Click on it to launch the tool.
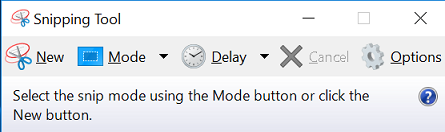
Once the Snipping Tool is open, you can begin capturing screenshots by selecting the mode that you want to use. The Snipping Tool offers several different capture modes, including full screen, window, freeform, and rectangular.
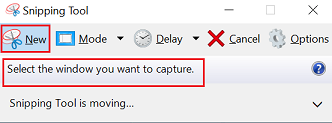
To capture a full screen snip, simply click the “New” button in the Snipping Tool window. The screen will dim and you can use your mouse to select the area of the screen that you want to capture. Once you have made your selection, the Snipping Tool window will reappear with your snip displayed. You can then use the annotation and highlighting tools to add notes or draw attention to specific parts of the screenshot.
To capture a window snip, click the “New” button and then click and drag your mouse over the window that you want to capture. The Snipping Tool will automatically capture the entire window, including any scrollable content.
To capture a freeform snip, click the “New” button and then use your mouse to draw the shape of the area that you want to capture. This is useful for capturing irregularly shaped areas of the screen.
To capture a rectangular snip, click the “New” button and then click and drag your mouse to create a rectangle around the area that you want to capture. This is the most common capture mode and is useful for capturing standard rectangular areas of the screen.
Once you have captured a snip, you can save it to your computer or share it with others using the options provided in the Snipping Tool window.
Features of the Snipping Tool on Lenovo Computers
The Snipping Tool on Lenovo computers provides a number of useful features that can help users capture and annotate screenshots with ease. Here are some of the key features of the Snipping Tool:
- Capture modes: As mentioned in the previous section, the Snipping Tool offers four different capture modes: full screen, window, freeform, and rectangular. These capture modes allow users to capture exactly the area of the screen that they need, whether it’s a full screen, a specific window, an irregularly shaped area, or a standard rectangular area.
- Annotation and highlighting tools: The Snipping Tool includes a range of annotation and highlighting tools that can be used to add notes and draw attention to specific parts of a screenshot. These tools include a pen, highlighter, and eraser, as well as the ability to add text and shapes. These tools can be used to communicate and collaborate with others, or simply to organize and highlight information on a screenshot for personal use.
- Saving and sharing options: Once a snip has been captured and annotated, users can save it to their computer or share it with others using the options provided in the Snipping Tool window. Snips can be saved as image files (such as JPEG or PNG) or copied to the clipboard for pasting into other applications. Users can also share snips directly via email or through other messaging or collaboration tools.
- Automatic saving: Users can set the Snipping Tool to automatically save snips to a specific location on their computer. This can be a convenient way to quickly and easily save and organize snips without having to manually save them each time.
In addition to these features, the Snipping Tool also includes a number of advanced options that can be accessed through the Settings menu. These options include the ability to change the pen and highlighter colors, set the Snipping Tool to start automatically with Windows, and more.
Overall, the Snipping Tool on Lenovo computers is a feature-rich tool that can greatly improve productivity and efficiency for users. Whether you are capturing and annotating screenshots for personal use or for collaboration with others, the Snipping Tool is a valuable tool to have at your disposal.
Advanced Uses of the Snipping Tool on Lenovo Computers
While the Snipping Tool on Lenovo computers is a powerful tool on its own, there are also a number of advanced uses and techniques that can help users streamline their workflow and get even more out of the tool. Here are some examples:
- Setting up the Snipping Tool to automatically save snips to a specific location: As mentioned in the previous section, the Snipping Tool has the option to automatically save snips to a specific location on your computer. This can be a convenient way to quickly and easily save and organize snips without having to manually save them each time. To set up automatic saving, click on the “Settings” button in the Snipping Tool window and then select the “Auto-save snips” option. From here, you can specify the location where you want your snips to be saved and choose a file name format for the snips.
- Using the Snipping Tool in combination with other productivity tools: The Snipping Tool can be a useful tool for capturing and annotating information from your screen, but sometimes you may want to do more with that information. One way to do this is by using the Snipping Tool in combination with other productivity tools. For example, you could use the Snipping Tool to capture a screenshot of an email or document, and then use a tool like OneNote to further organize and categorize the information contained in the screenshot. This can be a convenient way to keep track of important information and stay organized.
- Troubleshooting common issues with the Snipping Tool on Lenovo computers: While the Snipping Tool is generally a reliable tool, there may be times when you encounter issues while using it. Some common issues that users may encounter include the Snipping Tool not opening, the Snipping Tool freezing or crashing, or the Snipping Tool not capturing the correct area of the screen. If you encounter any of these issues, there are a few steps you can try to troubleshoot the problem. These include restarting the Snipping Tool, checking for updates to the tool, and running a diagnostic on your computer to check for any other issues that may be causing the problem.
By learning and applying these advanced uses and techniques, users of Lenovo computers can maximize the potential of the Snipping Tool and use it to improve their productivity and efficiency.
Conclusion: The Snipping Tool is a Valuable Tool for Improving Productivity on Lenovo Computers
In this blog post, we have explored the various features and uses of the Snipping Tool on Lenovo computers. The Snipping Tool is a versatile and powerful tool that allows users to easily capture and annotate screenshots of their screen, either in full or in part. It offers a range of annotation and highlighting tools, as well as options for saving and sharing snips, making it a valuable tool for productivity and collaboration.
In addition to its basic capabilities, the Snipping Tool also offers advanced features and techniques that can help users streamline their workflow and get even more out of the tool. These include the ability to set up automatic saving, use the Snipping Tool in combination with other productivity tools, and troubleshoot common issues.
Overall, the Snipping Tool is a valuable tool that can greatly improve productivity for users of Lenovo computers. If you haven’t yet tried out the Snipping Tool on your Lenovo computer, we encourage you to give it a try and see its potential for improving your workflow and efficiency.
Frequently Asked Questions about Lenovo’s snipping tool
The Snipping Tool is a feature that comes pre-installed on many modern computer operating systems, including those used on Lenovo computers. It allows users to easily capture screenshots of their screen, either in full or in part, and provides tools for annotating and highlighting the screenshot.
There are several ways to access and launch the Snipping Tool on Lenovo computers. One method is to click on the Start button in the bottom left corner of the screen, type “Snipping Tool” in the search bar, and press Enter. The Snipping Tool should appear in the search results. Another method is to press the Windows key and the S key at the same time, type “Snipping Tool” in the search bar, and press Enter.
The Snipping Tool on Lenovo computers offers four different capture modes: full screen, window, freeform, and rectangular. Full screen mode allows users to capture the entire screen, window mode captures a specific window, freeform mode allows users to draw the shape of the area they want to capture, and rectangular mode captures a standard rectangular area.
Yes, the Snipping Tool on Lenovo computers includes a range of annotation and highlighting tools that can be used to add notes and draw attention to specific parts of a screenshot. These tools include a pen, highlighter, and eraser, as well as the ability to add text and shapes.
Yes, once a snip has been captured and annotated, users can save it to their computer or share it with others using the options provided in the Snipping Tool window. Snips can be saved as image files (such as JPEG or PNG) or copied to the clipboard for pasting into other applications. Users can also share snips directly via email or through other messaging or collaboration tools.
Yes, users can set the Snipping Tool to automatically save snips to a specific location on their computer by accessing the Settings menu in the Snipping Tool window and selecting the “Auto-save snips” option. From here, users can specify the location where they want their snips to be saved and choose a file name format for the snips.
If you encounter any issues with the Snipping Tool on your Lenovo computer, there are a few steps you can try to troubleshoot the problem. These include restarting the Snipping Tool, checking for updates to the tool, and running a diagnostic on your computer to check for any other issues that may be causing the problem. If these steps do not resolve the issue, it may be necessary to seek further assistance from Lenovo customer support or a technical expert.