- Introduction about wiring 12 volt lights to a battery
- Step-by-Step Wiring Instructions
- Maintenance and Upkeep
- Conclusion: Wiring 12 Volt Lights to a Battery
- FAQs about wiring 12 volt lights to a battery
- What is the purpose of wiring 12 volt lights to a battery?
- What materials and tools do I need to wire 12 volt lights to a battery?
- What safety precautions should I take before wiring 12 volt lights to a battery?
- Can I install 12 volt lights to a battery myself, or do I need to hire a professional electrician?
- How do I maintain and test my 12 volt lighting system?
Introduction about wiring 12 volt lights to a battery
Welcome to our guide on how to wire 12 volt lights to a battery! Properly wiring your 12 volt lighting system is crucial for ensuring a reliable and efficient lighting source in your car, boat, or other vehicle. Whether you’re installing new lights or upgrading an existing lighting system, it’s important to follow the proper steps and use the right tools and materials to ensure a safe and successful installation.
In this guide, we’ll walk you through the entire process of wiring 12 volt lights to a battery, from gathering the necessary materials to completing the installation and performing routine maintenance. We’ll also provide tips and troubleshooting advice to help you along the way.
Before you get started, it’s important to familiarize yourself with the materials and tools you’ll need for the job. You’ll need a 12 volt battery, 12 volt lights, wire strippers, wire connectors, and possibly a soldering iron if you’re working with more complex wiring systems. It’s also a good idea to have a multimeter on hand for testing and troubleshooting purposes.
When selecting your battery and lights, it’s important to consider the specific needs of your vehicle and lighting system. You’ll want to choose a battery that is powerful enough to support the lighting system and has a long lifespan, and you’ll want to choose lights that are bright enough to provide sufficient illumination and are durable enough to withstand the rigors of use in a vehicle.
Once you’ve gathered all the necessary materials and tools, it’s important to take a few safety precautions before starting the wiring process. Make sure you’re working in a well-ventilated area, and be sure to follow all instructions and warnings provided by the manufacturers of the battery and lights.
Now that you’re familiar with the materials and safety considerations, it’s time to start wiring your 12 volt lights to the battery. Follow the step-by-step instructions in the next section of this guide to complete the installation process. And remember, if you ever feel unsure or encounter any difficulties, don’t hesitate to seek the assistance of a professional electrician.
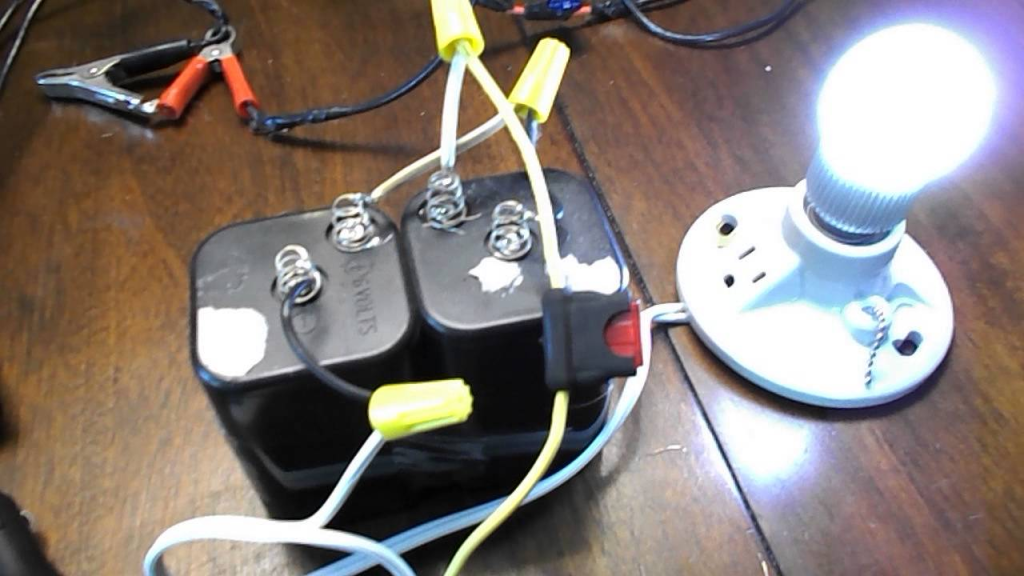
Step-by-Step Wiring Instructions
Now that you’ve gathered all the necessary materials and taken the appropriate safety precautions, it’s time to start wiring your 12 volt lights to the battery. Follow these step-by-step instructions to complete the installation process:
- Locate the positive and negative terminals on the battery. The positive terminal is usually marked with a “+” symbol, while the negative terminal is usually marked with a “-” symbol.
- Determine the placement of the lights. Consider the location and angle of the lights to ensure that they will provide sufficient illumination for the intended purpose.
- Measure and cut the wire to the appropriate length. The wire should be long enough to reach from the battery to the lights, with enough excess to allow for some flexibility in placement.
- Strip the insulation from the ends of the wire. Use wire strippers to carefully remove about 1/2 inch of insulation from the ends of the wire.
- Connect the wire to the positive terminal of the battery. Use a wire connector to secure the wire to the positive terminal. If you’re using a soldering iron, you can also solder the wire to the terminal for a more secure connection.
- Connect the other end of the wire to the positive terminal of the lights. Use a wire connector to secure the wire to the positive terminal of the lights. Again, you can also use a soldering iron to make a more secure connection if desired.
- Repeat the process with a second wire, connecting it from the negative terminal of the battery to the negative terminal of the lights.
- Test the lights to ensure that they are functioning properly. Turn on the lights and check that they are providing sufficient illumination. If the lights are not working or are dim, check the connections and troubleshoot any issues as needed.
- Secure the lights and battery in place. Use mounting brackets or other suitable fasteners to secure the lights and battery in place. Make sure that the lights and battery are securely fastened to prevent damage or accidents during use.
- Perform routine maintenance and testing. Regularly check and test the lighting system to ensure that it is functioning properly. Replace the battery or lights as needed to maintain a reliable and efficient lighting source.
By following these step-by-step instructions, you can successfully wire your 12 volt lights to a battery and enjoy the benefits of a reliable and efficient lighting system in your vehicle. If you have any questions or encounter any difficulties during the process, don’t hesitate to seek the assistance of a professional electrician.
Maintenance and Upkeep
Now that you’ve successfully installed your 12 volt lighting system, it’s important to perform routine maintenance and testing to ensure that it remains reliable and efficient. Here are some tips for maintaining and testing your lighting system:
- Check connections regularly. Over time, wire connections can loosen or corrode, which can cause problems with the lighting system. Regularly inspect the connections to make sure they are secure and free of corrosion.
- Test the lighting system regularly. Turn on the lights and check that they are providing sufficient illumination. If the lights are dim or flickering, there may be an issue with the connection or the battery.
- Replace the battery as needed. The lifespan of a 12 volt battery will vary depending on the type of battery and the amount of use it receives. Regularly check the battery to ensure that it is functioning properly, and replace it as needed to maintain a reliable lighting source.
- Replace the lights as needed. Like any other component of your vehicle, lights can wear out over time. If you notice that your lights are dimming or flickering, it may be time to replace them. Choose high-quality, durable lights to ensure a long lifespan and reliable performance.
- Seek professional help if needed. If you’re unsure about any aspect of the maintenance or testing process, or if you encounter any issues that you’re unable to resolve, don’t hesitate to seek the assistance of a professional electrician.
By following these maintenance and upkeep tips, you can ensure that your 12 volt lighting system remains reliable and efficient for years to come. Properly maintaining your lighting system will not only improve the safety and functionality of your vehicle, but it will also save you time and money in the long run.
In this guide, we’ve provided a step-by-step guide for wiring 12 volt lights to a battery. We’ve covered everything from gathering the necessary materials and taking safety precautions to completing the installation process and performing routine maintenance. By following these instructions and tips, you can successfully wire your 12 volt lighting system and enjoy the benefits of a reliable and efficient lighting source in your vehicle.
However, if you’re ever unsure about any aspect of the wiring process or encounter any difficulties, don’t hesitate to seek the assistance of a professional electrician. Working with electricity can be dangerous, and it’s always better to be safe than sorry.
By properly wiring your 12 volt lighting system, you’ll improve the safety and functionality of your vehicle, and you’ll also save time and money in the long run. Whether you’re installing new lights or upgrading an existing lighting system, the benefits of a well-wired lighting system are undeniable. So follow these instructions and enjoy the benefits of a reliable and efficient 12 volt lighting system in your vehicle.
Conclusion: Wiring 12 Volt Lights to a Battery
In this guide, we’ve provided a step-by-step guide for wiring 12 volt lights to a battery. We’ve covered everything from gathering the necessary materials and taking safety precautions to completing the installation process and performing routine maintenance. By following these instructions and tips, you can successfully wire your 12 volt lighting system and enjoy the benefits of a reliable and efficient lighting source in your vehicle.
However, if you’re ever unsure about any aspect of the wiring process or encounter any difficulties, don’t hesitate to seek the assistance of a professional electrician. Working with electricity can be dangerous, and it’s always better to be safe than sorry.
By properly wiring your 12 volt lighting system, you’ll improve the safety and functionality of your vehicle, and you’ll also save time and money in the long run. Whether you’re installing new lights or upgrading an existing lighting system, the benefits of a well-wired lighting system are undeniable. So follow these instructions and enjoy the benefits of a reliable and efficient 12 volt lighting system in your vehicle.
FAQs about wiring 12 volt lights to a battery
Wiring 12 volt lights to a battery is a necessary step in installing a lighting system in a car, boat, or other vehicle. The battery provides a power source for the lights, and the wiring connects the lights to the battery to ensure that they receive a reliable and efficient supply of power. Properly wiring the lights to the battery is crucial for ensuring a reliable and efficient lighting system.
You’ll need a 12 volt battery, 12 volt lights, wire strippers, wire connectors, and possibly a soldering iron if you’re working with more complex wiring systems. It’s also a good idea to have a multimeter on hand for testing and troubleshooting purposes.
Before starting the wiring process, make sure you’re working in a well-ventilated area and follow all instructions and warnings provided by the manufacturers of the battery and lights. Wear protective eyewear and gloves, and be sure to follow proper safety procedures to avoid electric shock or injury.
Whether or not you can install 12 volt lights to a battery yourself will depend on your level of experience and expertise with electrical work. If you’re comfortable working with electricity and have the necessary tools and materials, you may be able to complete the installation process yourself. However, if you’re unsure about any aspect of the process or if you encounter any difficulties, it’s always a good idea to seek the assistance of a professional electrician.
To maintain and test your 12 volt lighting system, regularly check and test the connections to ensure that they are secure and free of corrosion. Turn on the lights and check that they are providing sufficient illumination. If the lights are dim or flickering, there may be an issue with the connection or the battery. Replace the battery or lights as needed to maintain a reliable and efficient lighting source. If you’re unsure about any aspect of the maintenance or testing process, or if you encounter any issues that you’re unable to resolve, seek the assistance of a professional electrician.